

Reversing a wide angle lens is always a great way to reach larger than life-size magnification with your DSLR. This wide angle reverse technique is quick and uncomplicated so its easy way to get close, really close! With the Sigma 24mm Art lens Reversed on a Nikon D810 as seen above I was seeing 5x or five times life-size using only the 77mm to F-mount adapter.
Larger than life-size can really open up a new world, this wrapping paper below looks almost unrecognizable at 5x.
Be sure to click on the photos below to open in a new window at 1600 pixels.

Red glitter made with a Sigma 24mm Art lens on a D810 with a single flash at 5X or five times life-size.

The same gift paper at a more normal size, or about 0.5x or 1/2 life-size.
Why a wide angle lens?
When mounted in reverse a wide angle lens plane of focus much farther away from the sensor than when mounted normally so this means the lens is working with more extension and more extension means more magnification. A simple rule is that the shorter the focal length of a lens the more magnification you will see when you reverse it.

Pencils with Sigma 24mm Art lens on a D810 with a single flash at 5X or five times life-size.

Getting the lens reversed.
Mounting a reversed lens on a DSRL is easy. First you will need to a reverse adapter with your camera mount on the back and male threads that match your lenses filter threads on the front. This item should cost about $20 in shops or less than $10 on ebay from an overseas seller. Adapters are so reasonable and easy to get avoid the temptation to use tape to mount the lens or even worse to free-hold, or hold the lens backwards without being mounted.
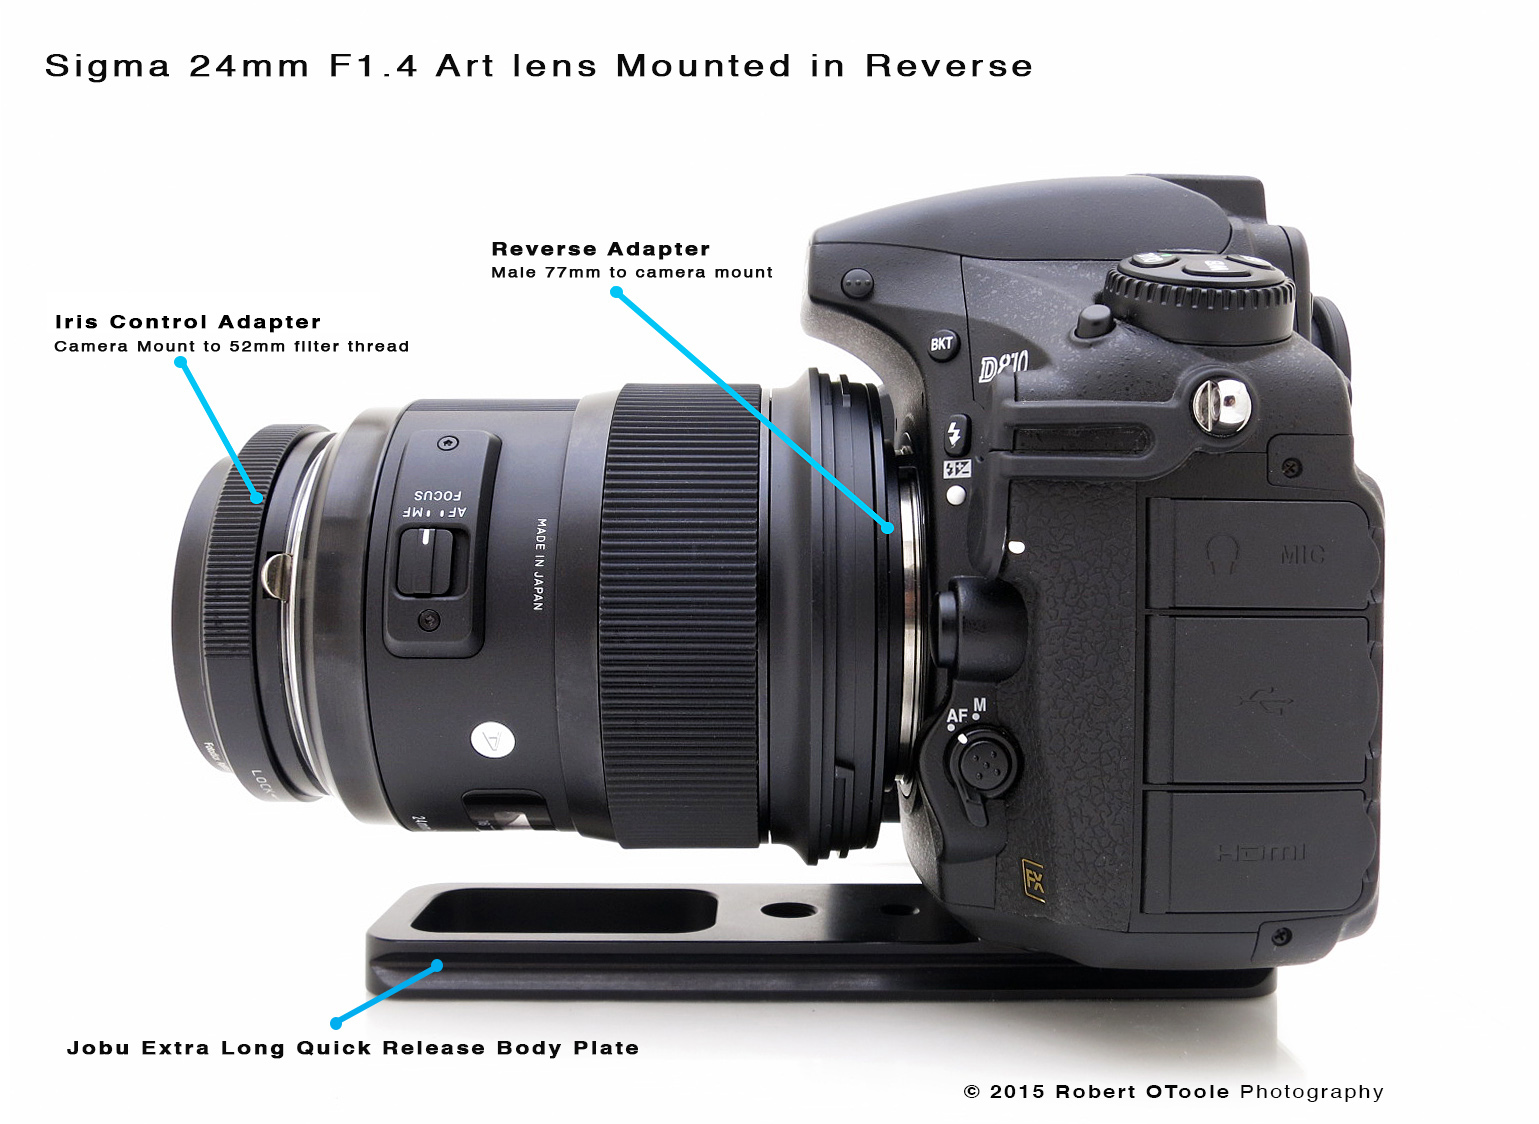
This is the 77mm to Nikon F mount Reverse adapter and a Fotodix Iris control adapter I used to make the images in this post. The Jobu extra long quick release plate was also important since I use it to clamp a flash bracket.

Front and rear views of the Sigma 24mm Art lens with the two adapters.

Reverse adapters male 77mm threads on the left and the F-mount rear on the right.
Aperture control
When you reverse the a lens you will lose automatic aperture control. If you are using F-mount, the lens iris will close, if you are using an electronic iris like the EF mount or Sony E-Mount the iris will open. You will want to shoot at a couple stops down from maximum so you will need to control the iris if you are not using a lens with a aperture ring.
Nikon F-mount
Sigma Art lenses for F-mount are all G-type lenses so you will have to use an adapter to have control over the f-stop since there is no aperture ring.
There is a way to set the aperture with an F-mount lens reversed without an adapter by holding the lens iris control tab open with a finger or piece of tape. With this method the actual f-stop is really hard to set consistently so I prefer spending the couple of bucks for an adapter although it does work in an emergency.
To make the images in this post I used a Fotodix Aperture Control 52mm Filter unit. These run about $25 or so.

Fotodix F-mount iris control adapter gives you an F-mount at the rear and at the front it has 52mm filter threads that could be used to mount a hood, diffuser or even a flash.

This is the pin that pushes the lenses iris control tab to open and closes the lens iris.
Canon EF mount and Sony E-mount
When you reverse am electronic iris equipped lens like an EF mount or E-mount you will lose automatic aperture control. There are electronic iris control adapters out there in addition to manual control and I will
both these methods in the next post.
Lighting
This is the key to success with any close up photo so I always use a single flash with a diffuser in the field. Also you can work with ambient light in the studio but make sure to diffuse the light for pleasing results.
Focus Stacking
The closer your subject the less depth of field you have to work with. At magnifications greater than life-size your ability to stop the lens down to increase depth of field depth of field is limited by the effects of diffraction which can destroy the sharpness of the image.
For the images in this post I used a technique called focus stacking where I made multiple images at a sharp aperture then assembled the images using special software called stacking software. This technique really works wonders! I use Zerene Stacker software from Zerene Systems. Visit the site for a free demo version or if you would like to learn more:zerenesystems.com/cms/stacker
Flare
Since lenses were not designed to be used backwards a lot of lenses will flare when reversed so its important to shade the front of the lens. A Nikon BR-3 ring seem here works great and also give the lens 52mm threads for accessories.

Bougainvillea flower close up at about 0.33x or 1/3rd life-size.

Bougainvillea flower at 5X.

All content (including text, design, photos, layout, and graphics) are copyright © 2015 Robert OToole. All rights reserved.